Refractor (lens) – a refracting telescope. The lens is an optical lens. Most refractors are equipped with 2 lenses, apochromats – 3-5.
Advantages: simplicity of design, resistance to mechanical stress and weather conditions (including temperature extremes), clear and contrasting image, low light scattering, long service life, closed design (protection of optics from dirt and dust). The refractor does not require special maintenance.
Disadvantages: bulky, heavy weight, limited maximum lens diameter (up to 150 mm), high price of the device compared to reflectors with the same lens diameter, image distortion (chromatic aberration).
The recommended object of observation is the Moon, planets, ground objects. Easy to operate and maintain, this telescope is recommended for children and beginners. The refractor is also good for observations within the city.
Varieties of refractors (optical schemes)
- Achromat – corrects chromatic aberration and thereby improves image quality. This refractor is the most common. A long achromat is suitable for observing planets and the Moon, and a short one is suitable for observing nebulae, galaxies, comets.
- ED refractor – thanks to special ED glasses, it corrects chromatic and spherical aberration, which significantly improves image quality. Minus – high price.
- Apochromat – completely neutralizes chromatic aberration and produces the highest quality image. Disadvantages: very high cost and heavy weight. This technique is recommended for experienced astronomers and users who do astrophotography. The apochromat is good for observing nebulae and other deep sky objects (Deep-Sky).
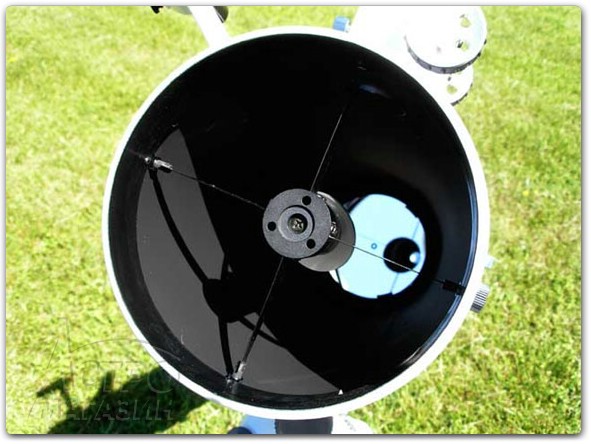
Reflector (mirror) – a reflecting telescope. The lens is a mirror. The reflectors are equipped with 2 mirrors.
Advantages: compactness, comparatively lower price with the same objective diameter as compared to refractors, maximally large objective diameter (up to 500-600 mm).
Disadvantages: sensitivity to mechanical stress, temperature changes, wind fluctuations and pollution (due to the open design), large light scattering, shorter service life, difficult maintenance, distortion at the edges of the picture (“coma”). The reflector needs regular adjustment, cleaning and renovation of the mirror.
The recommended object of observation is galaxies, nebulae and other objects of deep space. The reflector is perfect for observing the city.
Varieties of reflectors (optical schemes).
- Newton’s reflector is compact, cheap, has a large lens diameter. The most common type of reflectors, popular with beginners and amateurs.
- The Cassegrain reflector is a more compact solution, but due to the complexity of production, it is extremely rare.
- The Doll-Kerkema reflector is the best balance between price and picture quality.
- Ritchey-Chrétien reflector – provides a wide field of view and high image quality (good for astrophotography). Such a telescope does not give spherical aberration and coma. Disadvantages: very high price, complicated service.
Catadioptric (mirror-lens) – combines the characteristics of the previous types. A lens is a combination of a lens and a mirror.
Advantages: compactness, absence of distortions (optimal solution for astrophotography), closed design (not for all models), relative cheapness in comparison with refractors with the same objective diameter.
Disadvantages: high price compared to reflectors with equal lens diameter, low image contrast, strong light absorption, complex design.
The recommended object of observation is the planets, the Moon, stars, galaxies, nebulae. The catadioptric is equally good for observing in the city and in open space.
Varieties of catadioptrics (optical schemes).
- Schmidt-Cassegrain – compact, lightweight, provides high image quality. The disadvantage is a relatively small field of view.
- Maksutov-Cassegrain – favorably differs from the previous version by the absence of distortion and lower cost with the same lens diameter. The disadvantage is that this model is inferior to Schmidt-Cassegrain in terms of compactness.
- Schmidt-Newton – has an acceptable cost, a large field of view. The coma in such a telescope is reduced. The disadvantage is the large dimensions compared to other types of catadioptrics. It is a good choice for deep sky observation and astrophotography (it is advisable to purchase a coma corrector).
- Schmidt-Ritchey-Chrétien – thanks to its large field of view and the highest image quality, it is ideal for astrophotography. Disadvantages: high cost compared to other catadioptrics, difficult maintenance.
- Klevtsova is a compact model with a large lens diameter, has an acceptable cost, and a large field of view. This telescope is easy to carry. Disadvantages: complex maintenance, requires a focal length reducer for astrophotography.
Object of observation
Planets – a telescope with a relatively small lens diameter, giving an average magnification: for observing the Moon – 70-120 mm, for studying other objects of the solar system – 120-150 mm.
Stars, nebulae – a telescope with a large lens diameter (200 mm), giving the highest magnification.
Ground objects – a refractor with a small lens diameter (up to 100 mm) and a focal length. It is desirable that the telescope has a large field of view.
Mount
A mount is a device for aiming a telescope at the desired object of observation.
Azimuth (AZ) – cheap, compact, easy to use. A good option for observations of terrestrial objects and deep sky objects. The disadvantage is the complexity or impossibility of observations at the zenith. Not suitable for astrophotography, as it gives the effect of “smearing” the image. Azimuthal mount is optimal for small refractors and catadioptrics.
- Dobson mount is a kind of azimuthal mount, used in reflectors, because it has no restrictions on the diameter of the lens. It has the advantages of an azimuthal mount.
Equatorial (EQ) – more convenient than the azimuth mount when observing moving objects. Disadvantages: high price, design complexity. An equatorial mount is usually equipped with fine motion mechanisms or an electric drive. A similar option is used in professional telescopes.
Automated (Go-To) – equipped with a computerized drive and an auto-guidance system based on a database of space objects. Significantly speeds up the search for the desired object, does not require the use of maps, is well suited for astrophotography of dim objects (asteroids, variable stars). Disadvantages: high cost, the need for configuration, the need for power.
Focuser (focuser)
Rack – simple and cheap. Disadvantages: low accuracy and the presence of backlash. A rack and pinion focuser is used in amateur-level models.
Crayford – provides smooth focusing, has no backlash. The disadvantage is the possibility of slippage, which is very rare. The Crayford focuser is found in professional devices.
Threaded – according to the characteristics it resembles a rack. Needs periodic lubrication.
Seeker
Optical – cheap and simple option, does not require power supply. Well suited for working with a telescope in the city and in other places with strong sky glare. The disadvantage is the poor visibility of the finder markings in the dark sky. To solve this problem, an illuminated optical finder (battery operated) is used.
Pinpoint – Easier to use than an optical finderscope because it doesn’t require the observer to move their eye directly to the eyepiece (useful for objects that are close to the zenith). Such a finder is good for observations against a dark sky. Disadvantages: higher cost, power supply (battery) required.
Optical finders most often have a magnification (within 5-8x), but models with point aiming do not have this function. True, in some cases a wide field of view is more useful than magnification.
There are telescopes that do not have a seeker. These are devices with a small lens diameter, in which a small minimum magnification provides a wide field of view.
Characteristics
Objective diameter (aperture) – the diameter of the entrance lens (for optical models) or the diameter of the main mirror (for mirror models). Measured in inches or millimeters (mm). The larger the lens diameter, the higher its aperture and magnification.
Devices with a large aperture are great for observing and photographing objects in deep space. At the same time, as the aperture increases, the weight and cost of the telescope, primarily the refractor, increase.
Focal length – the distance from the lens or main mirror to the point where the light rays are collected (focus, forcal point). This implies that this distance provides the clearest picture. Measured in inches or millimeters.
The larger the focal length, the higher the magnification of the telescope and the longer its tube, and this negatively affects the comfort of observation and the transportability of the device.
For refractors and most reflectors, the length of the telescope tube is the same as the focal length. Catadioptrics do not obey this rule: their focal length is often 3-4 times the tube.
Important: usually the focal length is indicated by the manufacturer – on the lens or tube of the device. If it is not there, then to calculate this parameter you need to know its aperture ratio and lens diameter. For a telescope with aperture ratio 1/5 and aperture 150 mm, the focal length will be: 150×5=750 mm.
You should be aware that increasing the focal length leads to a decrease in the field of view of the telescope.
Aperture is the ratio between aperture and focal length. Aperture indicates the maximum amount of light that is collected by the lens. This parameter is written as a fraction: 1/5; 1/6; 1/10 and so on.
With an increase in aperture ratio, the cost and weight of the device increase, since a lens with a large aperture is used for this. A large aperture is needed for astrophotography and when working with low magnifications (objects of deep space). If you are going to make ordinary observations, it is better to choose a less powerful telescope.
Choosing a telescope by aperture ratio:
- 1/10-1/15 – telephoto lens with low aperture (visual observation);
- 1/6-1/10 – universal option;
- 1/4-1/16 – short throw lens with high aperture (astrophotography).
Relative aperture is the reciprocal of aperture ratio. Expressed in terms of the ratio of focal length to aperture. This parameter is indicated as a fraction: f/5; f/6; f/10 and so on.
The maximum useful magnification is determined by the focal length and the eyepiece. For a telescope with a focal length of 500 mm and an eyepiece of 5 mm, the maximum useful magnification is: 500/5=100x. Another calculation option is to multiply the diameter of the telescope by 2. This parameter can be changed by installing different eyepieces in the telescope.
The maximum useful magnification is the limit at which an image of acceptable quality can be obtained. Exceeding it will lead to a deterioration in the clarity of the picture.
The magnification depends on the observed object:
- D/7 – for the faintest extended objects of deep space (nebulae, galaxies);
- D / 3 – for brighter objects in deep space (globular clusters, nebulae, galaxies);
- 0.7xD – for globular clusters, small nebulae;
- 1xD, 1.4xD – for planets and a detailed view of the Moon;
- 2xD – for a detailed view of the planets and the Moon, a view of double stars.
D is the focal length of the telescope.
The minimum useful increase is the maximum allowable value, with a decrease in which image quality is lost. To calculate this parameter, the aperture should be divided by 6. For a telescope with a lens diameter of 120 mm, the minimum useful magnification is: 120/6=20x. Another option is to multiply the diameter of the telescope by 0.15.
The minimum useful magnification gives the maximum field of view and is used when observing deep sky objects.
The maximum resolution zoom is the magnification at which the image is as detailed as possible. Deviations up or down will result in loss of image detail. The maximum resolution magnification is slightly less than the maximum useful magnification parameter.
Penetrating power – indicates the ability of the telescope to observe dim stars. This parameter is equal to the magnitude of the faintest star that can be seen through a telescope under ideal conditions. A brighter celestial body has a smaller magnitude. The higher the penetrating power, the better the telescope will cope with the observation of dim objects.
Resolution – indicates the ability of the telescope to perceive light sources as separate objects. Resolution is expressed as the angular distance between objects that can be distinguished individually. The unit of measurement is arcseconds.
The higher this parameter, the better the telescope will cope with the observation of objects that are close to each other. It is believed that for the perception of such objects, the distance between them must be twice the specified resolution.
Resolution is determined by the Dawes criterion or by the Rayleigh criterion. The same telescope according to the Rayleigh criterion will have a lower resolution than according to the Dawes criterion.
Lens shielding is a non-optical distortion common to DSLR and catadioptric models. The larger this parameter, the worse the picture quality. Lens shielding is measured as a percentage of area and diameter, with the former being lower, which can be used by manufacturers for marketing purposes.
Field of view – the larger the field of view, the larger the area of \u200b\u200bthe sky visible through the telescope, but the smaller the objects. A large field of view makes it easier to find the desired object by coordinates. To calculate the field of view of the telescope, the field of view of the eyepiece should be divided by the magnification of the telescope with the given eyepiece.
Equipment
Eyepieces – help to adjust the degree of magnification of the telescope. To determine the magnification for the telescope in each case, divide the focal length of the objective by the focal length of the eyepiece. 500mm model with 5mm and 10mm eyepieces gives: 500/5=100x and 500/10=50x.
Important : when purchasing eyepieces separately, pay attention to their fitting size. The most common sizes are 0.96; 1.25 or 2 inches.
Telescopes with a 2-inch socket are preferred over other options: they give a wider field of view, many eyepieces, photo adapters, image correctors and other useful accessories are available in this size. The downside is the high price of such equipment.
Beginner models use 0.96 inch eyepieces, while more advanced telescopes use 1.25 inch eyepieces.
A Barlow lens is a diverging lens (or lens system) that is mounted in front of the eyepiece. Thanks to this lens, the focal length of the telescope and the degree of its magnification are increased by 2-3 times (based on the magnification factor). This reduces the viewing angle.
The magnification factor with a Barlow lens is calculated as follows: the magnification of a telescope with a particular eyepiece is multiplied by the magnification of the Barlow lens.
If a telescope with an eyepiece gave a magnification of 200x, then with a 2x Barlow lens, the magnification will be: 100×2 = 200x.
Reducer – reduces the focal length for Ritchey-Chrétien telescopes by 2 times.
Coma corrector – eliminates aberrations in SLR and catadioptric telescopes. Useful for astrophotography.
Filters – improve the clarity of the image, and also protect the eyes from overwork and damage.
There are several types of filters:
- lunar – transmits 18-50% of the light, perfect for observing the full moon (in other phases – for observing faint details of the lunar surface);
- solar – blocks up to 99.99% of light, used to observe sunspots, granulation, torch fields, installed in front of the lens;
- polarizing – transmits polarized light, makes it possible to adjust the transmittance within 5-25% to reduce the brightness of the picture when observing the moon;
- anti -light – cuts off narrow spectral bands, which reduces the level of urban illumination, useful when observing dim objects in deep space (including nebulae and galaxies);
- color (planetary) – transmit light of a certain wavelength and cut off all the rest. Used to highlight individual elements on the surface of planets. There are several types of color filters: green, orange, red, purple and others.
Remote – allows you to control the telescope from a distance. The electronic control improves comfort when using the device and is especially useful for astrophotography.
Auto- guidance system – independently directs the lens to the desired point in the sky at certain coordinates.
Auto- tracking system – independently keeps the desired object in view. A useful option for astrophotography as it prevents the blur effect. The auto-tracking system is also useful during long-term monitoring of one object.
In an azimuthal mount, auto-tracking involves the presence of auto-guidance and electronic control. In an equatorial mount, this possibility is provided by a clockwork or an electric motor.
Diagonal mirror – used in refractors and catadioptrics. Such a mirror is used for comfortable observation of objects near the zenith. Diagonal mirror can be built-in or removable.
Inverting lens – provides a correct (not inverted) image of the observed object. It is found in cheap models with small aperture and magnification parameters.
Tripod – securely fixes the telescope and reduces its shaking during observation. It is better to purchase a steel tripod, but it is too heavy for transportation. A lighter aluminum tripod is a great solution when using the telescope on the go. For comfortable work with the device in different conditions, the tripod is adjustable in height.
Bag – makes it easier to store and transport the telescope.
Selection Tips
- Purchase a telescope from a specialized store.
- A telescope that is too cheap will be useless, but a telescope that is too expensive is of little use in the hands of a layman.
- Inspect the telescope for scratches, chips, or other defects (pay special attention to lenses and/or mirrors). If damage is found, then it is better to refuse to purchase the device.
- Decide on the place where the telescope will stand. Please note that the device will require more space than it might seem at first glance. Therefore, when choosing a telescope in a store, ask the seller to rotate the device around its axis. This will help estimate the real space that the device will need.
The choice of a telescope is influenced by the living conditions of the owner:
- balcony of an apartment in the city, very rare trips out of town – a refractor with a tube up to 1 m, a catadioptric with an aperture of up to 150-200 mm;
- on the outskirts of the city, the possibility of going out of town – a refractor with a tube up to 0.5 m and an aperture of 100-120 mm;
- a private house in the city (small sky illumination) – a Newton reflector with an aperture of 200-250 mm, a Schmidt-Kassergen catadioptric, Maksutov-Kassergen with an aperture of 150 mm or more;
- a private house outside the city (lack of sky illumination) – a reflector with an aperture of 200 mm or more.
Operating tips
- Do not leave the telescope outdoors when you are not observing – this will shorten the life of the instrument.
- Perform periodic maintenance on your telescope to keep it performing at peak performance. This is especially true for reflectors and catadioptrics.